EDITOR’S NOTE: If you’ve never heard of rich snippets, they’re the “enriched” additions to the meta description that shows up with your blog post in search engine results such an customer reviews, star ratings, product price, etc. While rich snippets are not mandatory, they give your website that extra oomf that can drive more clicks, thus resulting in more visitors to your website. You can pick between many different rich snippet tags and which ones you add will depend on your business and its goals. For example an e-commerce store would likely want to display product image, price, availability, etc. A food blog would want to display the finish cuisine, cook duration, etc. Keep reading to learn two ways to add rich snippets to your search results. If you have any questions about your SEO strategy or want us to do it for you, reach out to us at Prebuilt Sites or The BBS Agency. We’d love to help you out!
How do you want your website to appear in search results? In one option, it appears with an image, customer reviews, and star ratings. For the second option, it appears without any of that.
Most of you would pick the first option—and we would too. The reason is simple. It makes your website look attractive, and its enriched description offers a quick understanding of what the users are looking into.
Here’s what a search result with a rich snippet looks like.
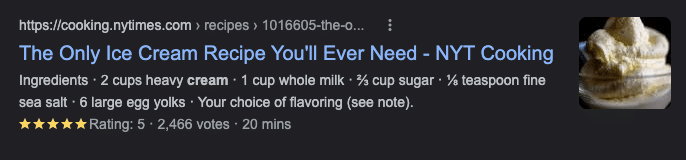
Photo: Layout
Now, here’s how your search would appear without a rich snippet.
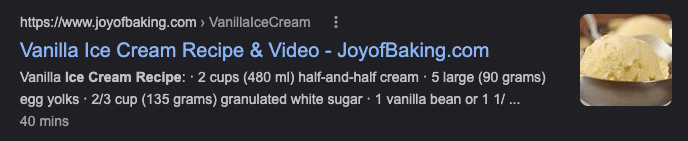
Photo: Layout
The way you set up your snippets is the key to making this visual change. A snippet of the result with the enriched description is one that has been optimized to display the image, reviews, and ratings. Such snippets are called rich snippets.
Although rich snippets are not really mandatory—they alone won’t help or hinder your ranking—having them can help you breathe new life into your Google search results. This, in turn, will help you boost your SEO and rank better in search results.
In the following paragraphs, we’ll teach you how to create rich snippets in Google to attract more clicks. There are two different ways of adding rich snippets to your business. We’ll examine both methods in detail in the following section. But first, let’s look at some of the basics you’ll need to know before you get started.
Important details to add to rich snippets
The first thing you need to do to add rich snippets to your webpage is to understand what you want Google to focus on your webpage. This, however, depends a lot on the type of content you publish.
For example, if it’s a recipe, you can add tags for recipe ratings, cooking duration, the image of the finished item, etc. Similarly, if it’s a product page, you can add the product image, product ratings, price, availability, or anything relevant.
You must have seen the author name, article published date, meta description, etc., below an article when you searched for an article. Such tags are usually added to web pages that publish articles.
Basically, you should add the tag that you want Google to display to your audience even without them opening your webpage. Once you know that, you can start adding them to your business.
Method 1: Using a plugin
The first way to add rich snippets to your web pages is to use the AIl in One SEO plugin, which is a one-stop SEO solution for your business. Using this brilliant plugin, you can get access to various advanced SEO tools that can help you improve your rankings in search results. Let’s check out how to use this plugin to add your rich snippets.
Step 1: Install the plugin
The first step to get started is to install the plugin on your WordPress website. Here’s a helpful guide if you don’t know how to install a plugin.
Step 2: Add person or organization
Once your plugin is activated on your site, go to the All in One SEO menu, click on Search Appearance. Now click on the Global Settings tab and scroll down to the Schema Markup section.

Photo: Layout
In this section, you’ll be able to choose what represents your business. It can be a person or an organization. Based on your business type, choose the best option for you. For the sake of this tutorial, we’ll select the organization tab.

Photo: Layout
Now fill out the form to add your business details. You can also upload your logo here. If you don’t add your logo, the plugin will automatically use the logo that you’ve uploaded to your website theme.
Step 3: Enable sitelinks search box
The next step is to enable your sitelinks search box. By adding this box you offer a quick way for people to search your site directly from the search results on Google. This feature is enabled by default, so you just have to make sure that the button is set to on in the Enable Sitelinks Search Box.

Photo: Layout
Step 4: Adding rich snippets
AIl in One SEO lets you add rich snippets to your content, taxonomies, individual posts, pages, and products. And not just that, you can also use it to enable your users to add a review for your business.
To start adding your rich snippets, you need to visit the All in One SEO menu and click on Search Appearance. Now click on the Content Types tab.

Photo: Layout
Here you’ll see sections for each of the types of content on your site such as posts, pages, and products.
So let’s see how to add schema to your posts. Just select the post for which you want to add schema. Now click on the Schema Markup to set schema for your Schema Type and Article Type.

Photo: Layout
Next select Article under Schema Type. Below Schema Type, you’ll see a setting for Article Type. It’s set to Blog Post by default, but you can choose what fits your content the best. You can repeat the same process for your pages and products as well.
Don’t forget to save your settings once you change them. That was easy, wasn’t it? But if you don’t want to use the plugin, there is another option.
Method 2: Using Google’s structured data markup helper
Step 1: Open Google’s Structured data markup helper
This is another simple and easy way to add rich snippets to your webpages. All you have to do is go to Google’s Structured Data Markup Helper. This will take you to the following page.
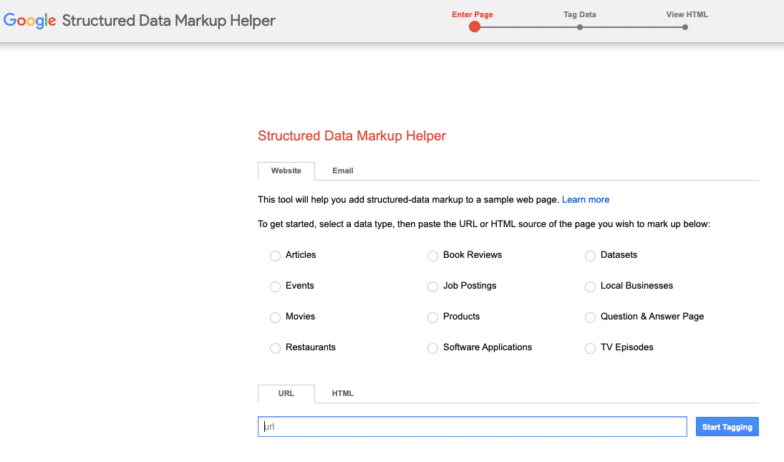
Photo: Layout
On this page, you need to select the attributes that best describe your content. Now enter the URL of your webpage where the content has been published. Using the data type you have selected, you then need to label your content to tell Google what it is about.
This is called creating microdata for your website. It’s basically like telling Google that this is my product, and here are the most important details about it.
The problem, however, is that Google doesn’t understand the language we speak. So you have to use HTML to tell it what you want it to do. For that, you first have to create microdata for your webpage.
Step 2: Create microdata for your webpage
In the next step, you need to create microdata for your webpage. After adding the URL, click on the ‘Start tagging’ button next to the URL field. This will take you to a new page where you’ll see your webpage on the left side of your screen and your data items on your left.
On this page, you can easily associate certain details of your webpage with your microdata that describes those details. For example, you want to display the author name of the article. In that case, simply highlight the author’s name by selecting it with your mouse.
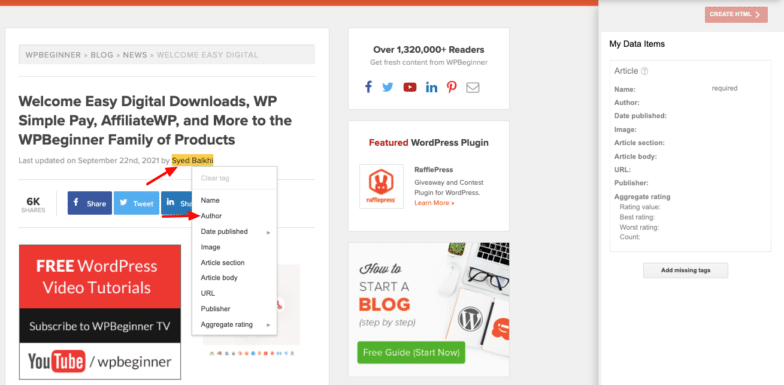
Photo: Layout
Now right-click on it and select ‘Author’ to tell Google that you want it to display the author name of your post. You’ll now notice that the author name is reflected in the data items section on your right. You can add all other relevant information you want by following the same process.
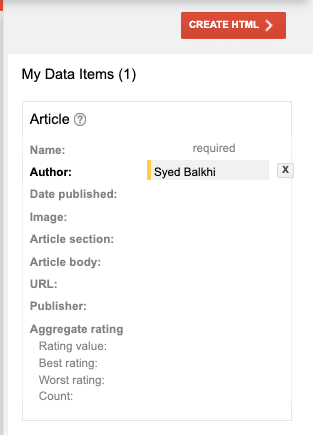
Photo: Layout
Step 3: Use microdata to create HTML for your webpage
In this step, you’ll use the microdata from the above step to create HTML for your webpage. For that, just click on the ‘Create HTML’ button located above ‘My Data Items’ on the right side of your screen.
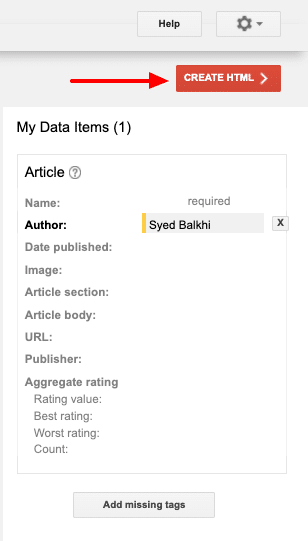
Photo: Layout
Step 4: Tag your content using the microdata
Your HTML should now be automatically created. You’ll see the tags you just created reflected in the block of codes on the right side of your screen, as shown below.
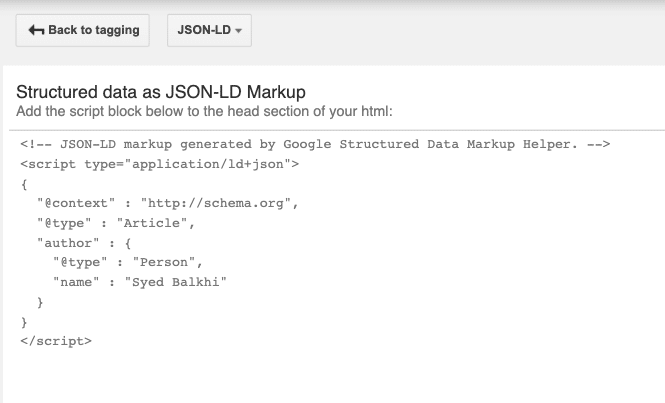
Photo: Layout
You can copy this code and paste it into your article’s HTML via your CMS. Ideally, you should paste it in the header section of your post’s HTML. Once you do that, save your settings, and you’re done.
And that’s it! Your rich snippets should be successfully added to your webpage. It is to be noted that it might take some time for Google to reflect the results. If that happens, don’t be disappointed. Just give it some time. Your rich snippet will definitely show up.
Originally posted on Layout.