With Black Friday and Cyber Monday just around the corner, eCommerce sites must be optimized for peak performance. WP Engine’s recent Page Speed Boost update SHOULD offer significant improvements in load times and page performance. However, there’s a critical cache issue preventing the caching of WooCommerce product and category pages that many site owners are unaware of.
If you do not do this… your WooCommerce Product and Category pages are NOT being cached.
Step-by-Step Solution to Ensure Caching for WooCommerce Product Pages
1. Update PageSpeed Boost Plugin
First, verify that you’re using version 1.17.2 of Page Speed Boost. Here’s how to ensure your plugin is up to date:
- Check Your Version: Go to your WordPress dashboard, find Page Speed Boost in the plugins list, and confirm you have version 1.17.2. If you don’t, update it through the WordPress dashboard or WP Engine’s automatic update feature.
- Manual Update for Complete Functionality: Once updated, it’s important to go into the plugin settings to MANUALLY activate caching on WooCommerce pages. This feature won’t work fully just from the update—you need to follow the next steps to enable product page caching.
2. Access PageSpeed Boost Settings Manually
With version 1.17.2 installed, head to the plugin settings.
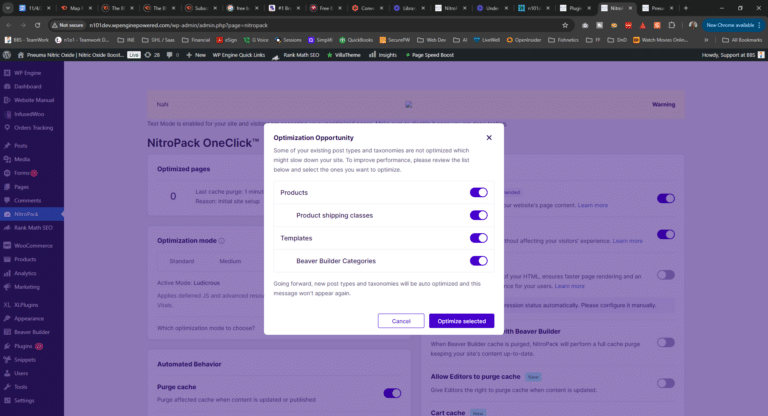
- Open the Settings Menu: Go to your WordPress dashboard, locate the PageSpeed Boost plugin, and click on Settings. Upon entering, you should see a pop-up notification prompting you to turn on caching for product pages.

- Activate PRODUCT & PRODUCT CATEGORY Caching: Ensure you follow the prompts to enable caching for all page types, especially under the Page Optimization section. If you close this pop-up, it won’t reappear, so be sure to complete this step to ensure WooCommerce product pages are fully optimized.
- Adjust Other Settings as Needed: Depending on your site’s configuration, you may have other options to optimize performance further. For example, if you use Beaver Builder or another page builder, be sure to turn on any caching or optimization options that apply.
3. Save Changes and Clear Cache
After completing the settings adjustments:
- Save Your Changes: Hit Save Changes to apply the new caching settings.
- Clear Cache: Clear your site’s cache and allow time for it to rebuild. This will activate the changes and ensure that your product pages are now cached.


